At long last, I present the project that's taken me since February to complete! I wanted to make the kids something for their second birthday that would be practical, affordable and usable over the next few years. This past winter, my parents gave me a small table and two matching chairs that my sister and I used over thirty years ago... and they looked every one of their thirty plus, well-loved years:
The chairs, one with the seat and backrest removed
The chairs needed reupholstering; and for some regrettable reason, I chose to re-cover the original vinyl in a cute but oh-so-cumbersome new vinyl fabric. I guess I was thinking about durability, but I really should have thought about gauge... aka, the thickness of the vinyl. Enchanted by the sweet little apple print, I failed to notice that the fabric had very little give and was closer in flexibility to cardboard than to chenille.
Being a reupholstery novice, I watched a few Youtube tutorials before getting started on my own project. I began by cutting the material, giving myself a lot of wiggle room on all sides:
A word about pattern: it was a challenge to match the apple pattern on the seat and the backrest, and darn near impossible to make the two chairs look the same. I gave up. As a rookie with restricted free time, it would have been wiser for me to choose a solid print.
Pulling the vinyl tight, I stapled the sides of the seat:
When working with a stiff fabric like vinyl, it's a good idea not to staple too close to the corners, so that you have more material to work with. I also trimmed the excess vinyl in the corners.
However, no sooner did I begin folding corners when I realized that there was no way I could follow the instructions I saw on-line. Most tutorials suggested folding the corners like you'd gift-wrap the ends of a present. However, the thickness of the vinyl made the corners look bulky and uneven. Plus, as you can see above, the seat corners are rounded, thereby giving me no straight edge to work with:
After a lot of finangling, this was the best corner I could come up with using basic upholstery techniques
After a lot of trial and error, I hit upon the idea of cutting the vinyl into strips, and stapling each piece individually. This meant that I could adjust each strip to accommodate the curve of the seat and the thickness of the fabric. The key is not to cut too close to the edge of the seat, otherwise the cuts will be visible once you turn the seat over:
The fabric cut into thin strips...
... and stapled. Not a perfect corner, but I'm happier with this result than the one I got using the other technique
For the table, I wanted the paper to roll from underneath because the table surface isn't that big. I spent a lot of time trying to find a roll of paper that wasn't too wide and a method to fasten it to the table which would allow me to access it easily. Further, given that I was doing my running around during nap time (thanks Nana!), I didn't want to drive all over the place to find the various items I needed. So, IKEA was my one-stop shop for the
paper and the
brackets (which are actually meant for curtain rods). I went to Home Depot to cut the wooden dowel:
All of the components
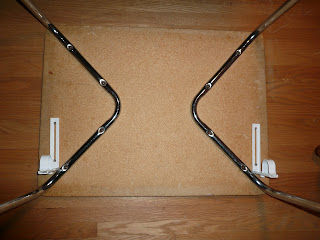
Side view of a bracket in place
Both brackets attached. The placement of the table legs posed a challenge. I would have liked to place the brackets closer to the table edge. As well, I had to make sure the brackets would project the dowel over the table legs.
The paper roll in place
For finishing touches, I ran the paper under the green polkadot ribbon, which acts as a paper guide. To that end, I also took one enormous black paper clip and hot-glued more ribbon to it to add a little colour, and used it to keep the loose end of the paper firmly in place. In order to protect the table top, I cut some foam board to the table's size and attached it with velcro so that it's easy to remove and replace. The third chair was an Opa's Value Village Treasure that I spray painted red. The final product in use:
So there you have it! It was true labour of love, but I enjoyed the challenge. And The Ducklings? Well, we basically have to pry them off the chairs for their nap. Here's hoping it will bring many years of fun and creativity - and a little quiet time for Mummy ;)


